Buyer Admin documentation
Free Format Module
Buyer Admin - How do I edit a Free Format Supplier?
Buyer Admin: How do I enable/disable a marketplace supplier in Free Format?
Contract Module
Buyer Admin: Introduction to the Contract Module
Buyer Admin: How do I create a local contract?
Buyer Admin: How do I approve a Framework?
Buyer Admin: How do I manage data within a live local contract?
Buyer Admin: How do I approve or reject Local Contracts?
Buyer Admin: How do I bulk upload local contracts to the Contract Module?
Buyer Admin: Contract Spend Analysis
Bring your own BI (BYOBI)
Introduction to BYOBI
BYOBI Data Dictionary - Purchase Orders & Order Lines
BYOBI Data Dictionary - Invoice
BYOBI Data Dictionary - Product & Price
BYOBI Data Dictionary - Item Visibility
The Purchasing Homepage and Administration Interface
Buyer Admin: How can I customise the Homepage for my organisation?
Buyer Admin: How do I create a Marketplace News article?
Buyer Admin: Introduction to the Administration interface
Workflow Editor
End User Management
Buyer Admin: Insights - How do I give access to users?
Buyer Admin: How do I deactivate a user's account?
Buyer Admin: How do I re-activate a user?
Buyer Admin: Can I update a user's name if their name changes?
Buyer Admin: How do I create new end user accounts (basket punchout)?
Buyer Admin: How do I change a user's account type?
Sustainability (ESG) Module
Buyer Admin: An introduction to Sustainability Data on Purchasing
Buyer Admin: Sustainability - Reporting on the ESG Insights Dashboard
Buyer Admin: How do I map sustainability attributes (supplier and global)?
Buyer Admin: How do I create my own organisation specific sustainability attributes for suppliers?
Buyer Admin: How do I approve a supplier level Global Sustainability Attribute?
Supplier Catalogue Management
Buyer Admin: Price Approval - How do I approve or reject a price file?
Buyer Admin: The Supplier Onboarding Module (SIM) overview
Buyer Admin: How do I connect with a supplier on my Purchasing marketplace?
Buyer Admin: How do I bulk invite suppliers to my Purchasing marketplace?
Buyer Admin: How do I make a hidden catalogue visible again?
Buyer Admin: How do I hide an entire supplier's catalogue?
Buyer Admin: How do I export a supplier catalogue?
Buyer Admin: How do I mark an entire supplier catalogue as 'Preferred'?
Buyer Admin - How can I change an item's visibility or status?
Supplier documentation
Managing catalogue data on the Supplier Portal
Supplier: How do I complete the OneAdvanced data templates?
Supplier: How do I upload my products?
Supplier: How do I add delivery charges to my catalogue?
UNSPSC Version Update Guide
Supplier: How do I hide a product from a buyer(s)?
Supplier: How do I amend catalogue pricing?
Supplier: How do I upload PDF documents to my products?
Supplier: How do I maintain leading zeros on a .csv download?
Supplier: How do I create new products individually?
Supplier: How do I export my catalogue?
Supplier: eClass codes
Supplier: How do I approve a price file?
Supplier: Catalogue Management tab - What does each file status mean?
Supplier: How do I upload images to my catalogue?
Supplier: How do I provide catalogue pricing?
Supplier: How do I delete products from my catalogue?
Supplier: Catalogue Management tab: How do I use the filtering options
Supplier: How do I edit my product data?
Supplier: Why has my price file failed?
Supplier: How do I amend a catalogue number?
Trader suppliers
Search and product visibility
Supplier: How do my products appear on Purchasing?
Supplier: The Purchasing Search: An overview for suppliers
Supplier: How do I find out if a product is currently visible to my buyers?
Contract Module
Supplier: Introduction to the Contract Module
Supplier: How do I update an active contract?
Supplier: Contract spend analysis
Supplier: How do I export contract data from the Contract Module?
Supplier: How do I activate a framework contract?
Supplier: How do I set up a local contract?
Sustainability Module
Supplier: An introduction to managing sustainability data
Supplier: How do I tag my products with sustainability attributes (Global and Supplier)?
Supplier: How do I tag my organisation against a global sustainability attribute?
Supplier: How do I create and manage supplier sustainability attributes?
Supplier: How can I see which of my products have sustainability attributes already assigned?
Supplier: How do I remove a sustainability attribute from my data?
Supplier: Sustainability - Reporting on the ESG Insights Dashboard
eQuotes
Insights reporting
Supplier Insights: Categorisation (UNSPSC) Dashboard
Supplier: How can I view Insights reports?
Supplier Insights: On and Off Catalogue Orders
Orders and Invoices
Supplier: Purchase Orders
Supplier: How do I resend a rejected e-invoice?
Supplier: PO flip invoicing and Credit Notes
Supplier: How can I review any invoice rejections?
Updating my profile
Buyer End User documentation
Buyer User Guide: How do I use the eQuotes module?
Buyer User Guide: How do I configure my Homepage?
Buyer User Guide: End User (eReqs and basket workflow users only): Multi Factor Authentication for logins
Buyer User Guide: How do I 'favourite' a product?
Buyer User Guide: How do I search for sustainable products?
Buyer User Guide: How do I create and use Saved Baskets?
Buyer User Guide: How do I download a PDF copy of my Purchase Order?
Buyer User Guide: The Purchasing Homepage
Buyer User Guide: How do I raise a free text order?
Supported Frameworks
Buyer Insights: On and Off Catalogue Orders
Buyer User Guide: Searching on the Purchasing marketplace
Buyer User Guide: How do I customise Insights on the homepage?
Release Notes & Product Roadmap
Release Notes
2026
2026-07-09 Release Notes
2026-06-25 Release Notes
2026-03-19 Release Notes
2026-03-10 Release Notes
2026-01-22 Release Notes
2026-01-08 Release Notes
2026-08-20 Release Notes
2026-09-17 Release Notes
2025
2025-12-11 Release Notes
2025-11-13 Release Notes
2025-10-16 Release Notes
2025-08-21 Release Note
2025-07-24 Release Notes
2025-07-10 Release Notes
2025-06-26 Release Notes
2025-05-30 Release Notes
2025-05-01 Release Notes
2025-04-04 Release Notes
2025-03-20 Release Notes
2025-03-06 Release Notes
2025-02-20 Release Notes
2024
2024-10-31 Release Notes
2024-10-17 Release Notes
2024-10-03 Release Notes
2024-09-05 Release Notes
2024-07-18 Release Notes
2024-06-20 Release Notes
2024-06-06 Release Notes
2024-05-23 Release Notes
2024-05-09 Release Notes
2024-04-18 Release Notes
2024-02-22 Release Notes
2024-01-18 Release Notes
2023
2023-12-11 Release Notes
2023-11-23 Release Notes
2023-11-09 Release Notes
2023-10-26 Release Notes
2023-10-12 Release Notes
2023-09-28 Release Notes
2023-08-30 Release Notes
2023-08-17 Release Notes
2023-08-03 Release Notes
2023-07-06 Release Notes
2023-06-22 Release Notes
2023-06-07 Release Notes
2023-05-24 Release Notes
2023-05-11 Release Notes
2023-04-27 Release Notes
2023-04-13 Release Notes
2023-03-30 Release Notes
2023-03-16 Release Notes
2023-03-02 Release Notes
2023-02-16 Release Notes
2023-02-02 Release Notes
2023-01-19 Release Notes
2022
2022-12-08 Release Notes
2022-10-13 Release Notes
2022-08-18 Release Notes
2022-08-04 Release Notes
2022-07-07 Release Notes
2022-06-23 Release Notes
2022-06-09 Release Notes
2022-05-26 Release Notes
2022-04-28 Release Notes
2022-03-03 Release Notes
2022-02-17 Release Notes
2022-01-13 Release Notes
2021
2021-11-25 Release Notes
2021-10-14 Release Notes
2021-09-30 Release Notes
2021-09-14 Release Notes
2021-09-11 Release Notes
2021-09-02 Release Notes
2021-08-19 Release Notes
2021-08-05 Release Notes
2021-07-22 Release Notes
2021-07-08 Release Notes
2021-06-24 Release Notes
2021-06-17 Release Notes
2021-05-27 Release Notes
2021-04-08 Release Notes Amendments Service
2021-03-04 Release Notes
2021-02-04 Release Notes
2021-01-21 Release Notes
2020-12-17 Release Notes
Product Roadmap
Marketplace (Purchasing) Video Content
Video - Purchasing Overview Project v1
Video - Saved Baskets and Favourites
Video - eOligo Module
Video - eServices Module
Video - Managing Internal Catalogues
Video - eQuotes
Video - Free Format
Video - eCatalogue Overview
Video - Supplier Insights
Video - Basket Workflow
Video - eFinancials Integration.mp4
Video - Punchouts
Video - Contract Management
Video - PO Flip eInvoicing
Video - Price Approval
Video - eRequisitions
Video - Sustainability Module - Buyers and Suppliers
Video - Buyer Insights
Logging into the Purchasing Marketplace
Buyer Admin: Accessing locked admin log-ins (including forgotten password)
Supplier: Multi Factor Authentication when logging in
Supplier: How do I request a new supplier portal login to be created?
Buyer Admin - How do I access my admin account?
Setting up MFA in Google Chrome Extension
Supplier: How do I reset my Purchasing account password?
Buyer Admin: Multi Factor Authentication for logins
Inactive User Account - How can I reactivate my marketplace login?
Setting up MFA in Microsoft Authenticator and Removing an Existing QR code
MFA Browser Extensions
Local Catalogue Management
Table of Contents
- All Categories
- Local Catalogue Management
- Local Catalogue Management: Uploading Local Catalogue Products
Local Catalogue Management: Uploading Local Catalogue Products

What is a local catalogue?
Local catalogues are managed by a buyer rather than a supplier, and can cover multiple supplier organisations. All management of the local catalogue data, including uploading of the product and pricing data is completed within the Supplier Portal which buyers must log into separately to their marketplace.
Orders are transmitted directly to the supplier(s), rather than via the Purchasing Marketplace.
How to complete the offline Local Catalogue Product Data Template
In addition to the mandatory fields within the product data template which all supplier catalogues must include (such as Catalogue Number, UNSPSC code etc.), the following fields may also need to be completed within the local catalogue product data template for your organisation:
- Supplier Name: the name of the supplier; a mandatory field
- Manufacturer Name: Must be the name of the local catalogue (e.g., “XXX NHS Trust Local Catalogue”)
- CPA: Contract Purchase Agreement number, if required
- eClassS3: must be completed if your organisation is an NHS Trust
- NEP SupplierName: Usually the same name as Supplier Name unless your organisation uses a different finance system name
- NEP SupplierSite: required if the supplier has multiple sites
Duplicate Catalogue Numbers
Local catalogues are treated as one single catalogue, meaning duplicate product codes cannot be accepted.
Duplicate codes may occur when:
- Multiple suppliers stock the same product
- Suppliers coincidentally use the same code
Files containing duplicates will fail validation.
Recommended Solutions
Choose one consistent method:
- Prefix or suffix with the supplier name (recommended) e.g. SUPPLIER123456
- Suffix “‑1” e.g. 123456‑1
- Suffix “.” e.g. 123456.
- Prefix or suffix with item name e.g., CHAIR123456
How to upload local catalogue products on the Catalogue Management tab
Once the local catalogue product template is ready, the following steps cover how buyers can upload product data to the supplier portal using the Catalogue Management tab.
- Once logged in to the supplier portal, go to the Catalogue management tab
- Select Upload in the top right of the screen and choose Products from the dropdown
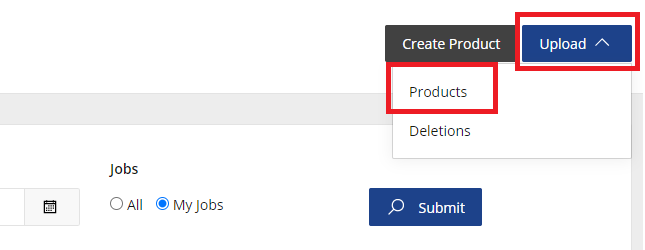
- The window you are presented with is split into three tabs.
The first tab you are defaulted to is File: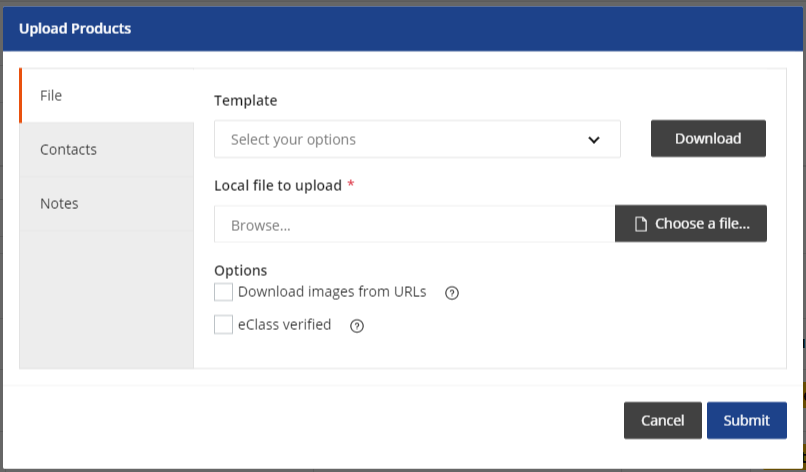
- The Template section allows you to download the following guides and templates:
- OneAdvanced standard data requirements guide: a guide that describes the format in which standard catalogue data should be provided to OneAdvanced
- Hazard and licencing field details: this lists the columns which are required for the Hazard Category and Code indicator columns. Section 2.17 of the Standard Data Requirements guide provides more information on how to populate these columns.
- Data template with hazard codes: Product data template to be used if you need to provide hazard information as part of your product data. This should not be used for local catalogue data uploads
- Data template: This is our standard data template and should not be used for local catalogue data uploads
- The Template section allows you to download the following guides and templates:
- Assuming the Local Catalogue Data Template has already been completed, go to the Local file to upload section, and click the browse button to select your completed template
- Under the Options section, tick the relevant boxes that apply:
- Download images from URLs: this must be ticked if you are uploading a product data file containing image URLs which need downloading
- eClass verified: this must be ticked if you are providing eClass codes in the file (which are mandatory for all NHS customers) so the system can validate them
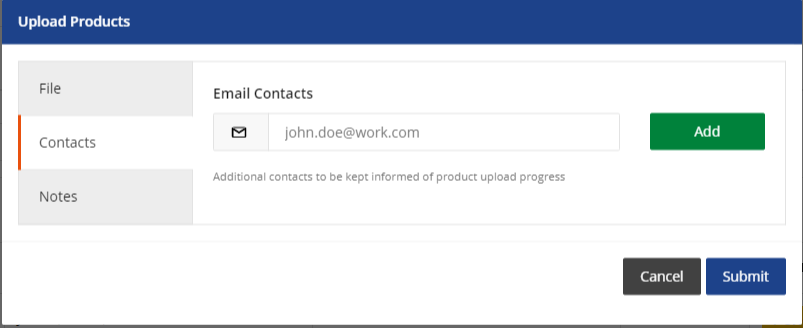
- The second tab within the upload window is Contacts, this allows you to add email addresses for those contacts within your organisation that you would like to be kept up to date with the status of your upload. The email addresses you add here are also displayed on the job when you click to view it.
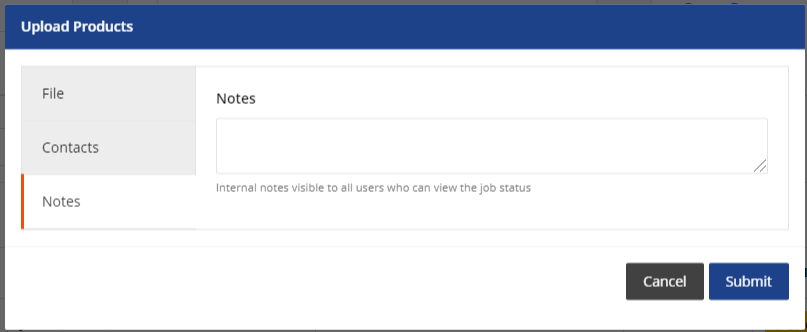
- The third tab within the upload window is Notes. Here you can add additional notes that you might want to capture against your upload and these will display on the job when you click to view it.
- Once you are happy to proceed, select Submit
- You can view your upload within the same catalogue management interface, listed at the top. You may need to click the 'refresh' button to track the progress a file is making.
- Once the upload has finished click View on the upload to view the full report.
- Next Steps: Once successfully uploaded, you can now proceed with uploading your pricing for the new products. Please follow the guide here: How do I provide catalogue pricing?
Why has my product file failed?
Your product upload may fail for a number of reasons, you can view the status page which outlines some of the reasons here: What does each file status mean?
Additionally we would always recommend clicking into an upload (using the 'View' button) to review any specific error messages relating to that upload.
You can also download a number of reports from these pages.
The main reasons a product file might fail are as follows:
- Mandatory columns (those in yellow) not completed
- Virus scan failure
- System time-out