Table of Contents
Supplier: How do I upload images to my catalogue?

Uploading Images
Images can be uploaded onto Purchasing (formerly Advanced Marketplace) either as URLs, JPGs or GIFs depending on how you store this data.
The process will depend on the format you are providing to us, but up to 25 images can be uploaded per product if required using either method.
Instructions for URL images can be found below; Please scroll further down the page for JPG and GIFs.
If you would prefer to watch a video guide, please click here.
URLs
There are two different ways to upload URLs. Whichever option you choose, please note that all image URLs need to be made public so that OneAdvanced are able to access and download them. This is vital to ensure the images display correctly on the system.
Option 1: Uploading URLs as part of the product upload
This option will allow you to upload your URLs in the image columns as part of the Product Data File upload.
- Go to the Catalogue Management tab > Upload > Products
- Complete the product data template as normal, including your image URLs in the 'Image 1' column (and any additional images in image 2, image 3 etc. up to 'Image 25' if applicable).
- Images can be JPEG, GIF or PNG
- An example image URL format that would be inputted would be: https://www.test.com/examplefile1.jpg
- The file can be saved as .xls, .xlsx or .csv
- Returning to the Upload Products pop-out, locate your saved product data file, and then tick the 'Download images from URLs' box. We have included a tool top which explains this when hovering over the ‘?’:
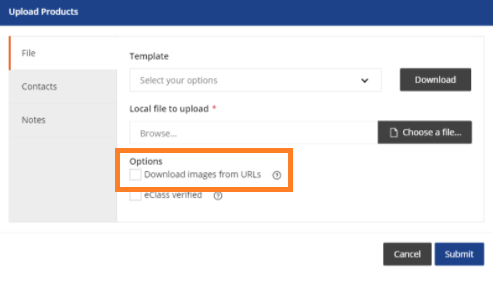
- Click Submit. Upon successful processing of the product file upload, OneAdvanced will download the images and host them on our system.
How can I track the progress of my upload?
You will continue to track the progress of the product upload via the Catalogue Management tab in the portal.
- If the file has a status of Succeeded, this means the full file has been successfully loaded and no further action is required
- A Partially Succeeded yellow status means that the file has only been partially successful. To review any errors, click the View button in the Actions column. If there have been issues with your URLs there will be a failed images report available to download to allow you to see the reason behind any failures.
- A Failed red status means that the full file has failed. To review any errors, click the View button in the Actions column.
You will also receive two emails detailing the progress, which are as follows:
- Additional URL information is provided in the product email that you normally receive, which provides details around how many files have been processed
- A further email will indicate how many images have been successful or failed and provides details of where you can view the relevant reports.
The email will be sent to the registered email address of the log-in that initiated the upload along with any portal contacts that have been set up in the ‘My Profile’ email preferences page.
Option 2: Upload a separate file containing URLs
This option allows you to refresh your URL data if any images have changed, but where the image reference (which must already have been loaded) has stayed the same.
- Create a CSV or Txt file containing only a list of the image URLs which need refreshing
- Images can be JPEG, GIF or PNG
- A URL would be added to the CSV or Txt file as: https://www.test.com/examplefile1.jpg
- There is no limit to how many URLs can be listed in the image upload file but the URLs need to be provided in a list format, not on the same row.
- The system will pick up all images across all the image columns from the product data file.
- The system will remove any duplicate URLs found. If duplicates are found, these will be available in the status report following upload.
- Go to the Image File Upload tab, and browse for the file you have created
- From the '3. Define file type' dropdown, select Images file - List of image URLs

- Submit the file. Once successfully loaded (you can view progress on the Image Upload status tab), OneAdvanced will download the Images from the URLs provided, and host them on our system.
How can I track the progress of my upload?
Using this method, the image URL upload will display as a separate listing on the Image Upload Status tab and a summary will be available which will detail the results of the job.
If there are any errors found during the file processing, an error report will be created and available to download, allowing you to see the reason behind any failures. The list of possible reasons are listed in the Appendix at the bottom of the page.
You will receive two emails detailing the progress, which are as follows:
- Additional information will be provided in the existing product email that you currently receive, which provides details around how many files have been processed.
- A further email will indicate how many images have been successful or failed and provides details of where you can view the report in the status option.
The emails will be sent to the registered email address of the log-in that initiated the upload along with any portal contacts that have been set up on the ‘My Profile’ email preferences page.
JPGs and GIFs
To upload images that are JPGs or GIFs, please follow the below instructions:
- Download the relevant Data Template from the Catalogue Management tab. You will need to complete, as a minimum, the yellow mandatory fields as well as the 'Image 1' column
- To complete the 'image 1' column please ensure you input the exact name of the image and extension as this is saved: e.g. redpen.jpg or redpen.gif. The column is case sensitive and will need to perfectly match the name of the file.
- If you are adding more than one image per product, you can add additional columns into the file beyond the two that are available as standard. ‘Image 1’ and ‘Image 2’ should be used first but additional columns can be added, up to a maximum of ‘Image 25’.
- Once the template is fully complete, upload it as normal via the Catalogue Management tab
- Once the data file has uploaded successfully, you will need to upload image files via a zip file.The file name, which is case-sensitive, should match the image name given in the ‘Image 1’ etc. column exactly, and must be followed by the appropriate file extension (which is also case-sensitive) e.g. redballpointpen.jpg.For this, go to the Image File upload tab.
- A pop-up appears and you can attach your images by selecting ‘Attach completed file’ and finding the file where your images are saved. For ease of upload, save all your images in a zip file and upload them all at once.
- Define your file type as ‘Image files - including GIF, JPEG or ZIP’ and upload your images.
- Once completed, you are able to check the status of the image file upload on the Image Upload Status tab
- If you need to check your uploaded images, you can check individual products by using the search bar at the top of the supplier portal.
Image Format
- Images should be provided in either JPG or GIF format
- Images are displayed as 600 pixels (wide) x 500 pixels (high). If the image is wider or taller than the dimensions specified, it will be reduced to the specified dimensions while maintaining the aspect ratio. Images smaller than the specified dimensions will not be increased in size.
Why is no image showing on my products?
Below are some common reasons why an image may not be displaying on a product:
- Image file name uploaded via the portal and the image reference loaded onto the portal do not match exactly – including the file extension
- The image file has not been uploaded via the portal
- The image reference had not been added to the product
Appendix: for URL option 2 uploads
A list of possible HTTP Status codes are as follows:
Error Message | Error Description |
200 OK | Standard response for successful HTTP requests |
201 Created | Successful creation occurred |
204 No Content | The server successfully processed the request, but is not returning any content. |
304 Not Modified | Indicates the resource has not been modified since last requested. |
400 Bad request | The request cannot be fulfilled due to bad syntax |
401 Unauthorised | Similar to 403 Forbidden, but specifically for use when authentication is possible but has failed or not yet been provided |
403 Forbidden | The request was a legal request, but the server is refusing to respond to it. Unlike a 401 Unauthorised response, authenticating will make no difference. |
404 Not Found | The requested resource could not be found but may be available again in the future |
409 Conflict | Indicates that the request could not be processed because of conflict in the request, such as an edit conflict. |
500 Internal server error | A generic error message, given when no more specific message is suitable. |
503 Service Unavailable | The server is currently unavailable (because it is overloaded or down for maintenance). Generally, this is a temporary state. |
List of possible application errors are as follows:
Error Message | Error Description |
Invalid URL: %s | The '%s' should be replaced with the reason why e.g. Unknown protocol htp if https was mistyped |
File extension not supported | file extension isn’t any of the supported file types |
Unsupported media type: %s | The media type of the file isn't one we support. The '%s' should be replaced with the relevant information |
Connection error | We were not able to connect to the host defined in the URL |