Buyer Admin documentation
Free Format Module
Contract Module
Buyer Admin: Introduction to the Contract Module
Buyer Admin: How do I create a local contract?
Buyer Admin: How do I approve a Framework?
Buyer Admin: How do I manage data within a live local contract?
Buyer Admin: How do I approve or reject Local Contracts?
Buyer Admin: How do I bulk upload local contracts to the Contract Module?
Buyer Admin: Contract Spend Analysis
Bring your own BI (BYOBI)
The Purchasing Homepage and Administration Interface
Buyer Admin: How can I customise the Homepage for my organisation?
Buyer Admin: How do I create a Marketplace News article?
Buyer Admin: Introduction to the Administration interface
Workflow Editor
End User Management
Buyer Admin: Insights - How do I give access to users?
Buyer Admin - How do I deactivate a user's account?
Buyer Admin: How do I re-activate a user?
Buyer Admin - Can I update a user's name if their name changes?
Buyer Admin - How do I create new end user accounts (basket punchout)?
Sustainability (ESG) Module
Buyer Admin: An introduction to Sustainability Data on Purchasing
Buyer Admin: Sustainability - Reporting on the ESG Insights Dashboard
Buyer Admin: How do I map sustainability attributes (supplier and global)?
Buyer Admin: How do I create my own organisation specific sustainability attributes for suppliers?
Buyer Admin: How do I approve a supplier level Global Sustainability Attribute?
Supplier Catalogue Management
Buyer Admin: Price Approval - How do I approve or reject a price file?
Buyer Admin: The Supplier Onboarding Module (SIM) overview
Buyer Admin: How do I connect with a supplier on my Purchasing marketplace?
Buyer Admin: How do I bulk invite suppliers to my Purchasing marketplace?
Buyer Admin: How do I make a hidden catalogue visible again?
Buyer Admin: How do I hide an entire supplier's catalogue?
Buyer Admin: How do I export a supplier catalogue?
Buyer Admin: How do I mark an entire supplier catalogue as 'Preferred'?
Buyer Admin - How can I change an item's visibility or status?
Buyer Admin: How do I enable/disable a marketplace supplier in Free Format?
Supplier documentation
Managing catalogue data on the Supplier Portal
Supplier: How do I complete the OneAdvanced data templates?
Supplier: How do I upload my products?
Supplier: How do I add delivery charges to my catalogue?
UNSPSC Version Update Guide
Supplier: How do I hide a product from a buyer(s)?
Supplier: How do I amend catalogue pricing?
Supplier: How do I upload PDF documents to my products?
Supplier: How do I maintain leading zeros on a .csv download?
Supplier: How do I create new products individually?
Supplier: How do I export my catalogue?
Supplier: eClass codes
Supplier: How do I approve a price file?
Supplier: Catalogue Management tab - What does each file status mean?
Supplier: How do I upload images to my catalogue?
Supplier: How do I provide catalogue pricing?
Supplier: How do I delete products from my catalogue?
Supplier: Catalogue Management tab: How do I use the filtering options
Supplier: How do I edit my product data?
Supplier: Why has my price file failed?
Supplier: How do I amend a catalogue number?
Trader suppliers
Search and product visibility
Supplier: How do my products appear on Purchasing?
Supplier: The Purchasing Search: An overview for suppliers
Supplier: How do I find out if a product is currently visible to my buyers?
Contract Module
Supplier: Introduction to the Contract Module
Supplier: How do I update an active contract?
Supplier: Contract spend analysis
Supplier: How do I export contract data from the Contract Module?
Supplier: How do I activate a framework contract?
Supplier: How do I set up a local contract?
Sustainability Module
Supplier: An introduction to managing sustainability data
Supplier: How do I tag my products with sustainability attributes (Global and Supplier)?
Supplier: How do I tag my organisation against a global sustainability attribute?
Supplier: How do I create and manage supplier sustainability attributes?
Supplier: How can I see which of my products have sustainability attributes already assigned?
Supplier: How do I remove a sustainability attribute from my data?
Supplier: Sustainability - Reporting on the ESG Insights Dashboard
eQuotes
Insights reporting
Supplier Insights: Categorisation (UNSPSC) Dashboard
Supplier: How can I view Insights reports?
Supplier Insights: On and Off Catalogue Orders
Orders and Invoices
Supplier: Purchase Orders
Supplier: How do I resend a rejected e-invoice?
Supplier: PO flip invoicing and Credit Notes
Supplier: How can I review any invoice rejections?
Updating my profile
Buyer End User documentation
Buyer User Guide: How do I use the eQuotes module?
Buyer User Guide: How do I configure my Homepage?
Buyer User Guide: End User (eReqs and basket workflow users only): Multi Factor Authentication for logins
Buyer User Guide: How do I 'favourite' a product?
Buyer User Guide: How do I search for sustainable products?
Buyer User Guide: How do I create and use Saved Baskets?
Buyer User Guide: How do I download a PDF copy of my Purchase Order?
Buyer User Guide: The Purchasing Homepage
Buyer User Guide: How do I raise a free text order?
Supported Frameworks
Buyer Insights: On and Off Catalogue Orders
Buyer User Guide: Searching on the Purchasing marketplace
Buyer User Guide: How do I customise Insights on the homepage?
Release Notes & Product Roadmap
Release Notes
2026
2026-07-09 Release Notes
2026-06-25 Release Notes
2026-03-19 Release Notes
2026-03-10 Release Notes
Q1 & Q2- Product Roadmap Update
2026-01-22 Release Notes
2026-01-08 Release Notes
2025
2025-12-11 Release Notes
2025-11-13 Release Notes
2025-10-16 Release Notes
2025-08-21 Release Note
2025-07-24 Release Notes
2025-07-10 Release Notes
2025-06-26 Release Notes
2025-05-30 Release Notes
2025-05-01 Release Notes
2025-04-04 Release Notes
2025-03-20 Release Notes
2025-03-06 Release Notes
2025-02-20 Release Notes
2024
2024-10-31 Release Notes
2024-10-17 Release Notes
2024-10-03 Release Notes
2024-09-05 Release Notes
2024-07-18 Release Notes
2024-06-20 Release Notes
2024-06-06 Release Notes
2024-05-23 Release Notes
2024-05-09 Release Notes
2024-04-18 Release Notes
2024-02-22 Release Notes
2024-01-18 Release Notes
2023
2023-12-11 Release Notes
2023-11-23 Release Notes
2023-11-09 Release Notes
2023-10-26 Release Notes
2023-10-12 Release Notes
2023-09-28 Release Notes
2023-08-30 Release Notes
2023-08-17 Release Notes
2023-08-03 Release Notes
2023-07-06 Release Notes
2023-06-22 Release Notes
2023-06-07 Release Notes
2023-05-24 Release Notes
2023-05-11 Release Notes
2023-04-27 Release Notes
2023-04-13 Release Notes
2023-03-30 Release Notes
2023-03-16 Release Notes
2023-03-02 Release Notes
2023-02-16 Release Notes
2023-02-02 Release Notes
2023-01-19 Release Notes
2022
2022-12-08 Release Notes
2022-10-13 Release Notes
2022-08-18 Release Notes
2022-08-04 Release Notes
2022-07-07 Release Notes
2022-06-23 Release Notes
2022-06-09 Release Notes
2022-05-26 Release Notes
2022-04-28 Release Notes
2022-03-03 Release Notes
2022-02-17 Release Notes
2022-01-13 Release Notes
2021
2021-11-25 Release Notes
2021-10-14 Release Notes
2021-09-30 Release Notes
2021-09-14 Release Notes
2021-09-11 Release Notes
2021-09-02 Release Notes
2021-08-19 Release Notes
2021-08-05 Release Notes
2021-07-22 Release Notes
2021-07-08 Release Notes
2021-06-24 Release Notes
2021-06-17 Release Notes
2021-05-27 Release Notes
2021-04-08 Release Notes Amendments Service
2021-03-04 Release Notes
2021-02-04 Release Notes
2021-01-21 Release Notes
2020-12-17 Release Notes
Product Roadmap
Marketplace (Purchasing) Video Content
Video - Purchasing Overview Project v1
Video - Saved Baskets and Favourites
Video - eOligo Module
Video - eServices Module
Video - Managing Internal Catalogues
Video - eQuotes
Video - Free Format
Video - eCatalogue Overview
Video - Supplier Insights
Video - Basket Workflow
Video - eFinancials Integration.mp4
Video - Punchouts
Video - Contract Management
Video - PO Flip eInvoicing
Video - Price Approval
Video - eRequisitions
Video - Sustainability Module - Buyers and Suppliers
Video - Buyer Insights
Logging into the Purchasing Marketplace
Buyer Admin: Accessing locked admin log-ins (including forgotten password)
Supplier: Multi Factor Authentication when logging in
Supplier: How do I request a new supplier portal login to be created?
Buyer Admin - How do I access my admin account?
Setting up MFA in Google Chrome Extension
Supplier: How do I reset my Purchasing account password?
Buyer Admin: Multi Factor Authentication for logins
Inactive User Account - How can I reactivate my marketplace login?
Setting up MFA in Microsoft Authenticator and Removing an Existing QR code
MFA Browser Extensions
Table of Contents
- All Categories
- Supplier documentation
- Contract Module
- Supplier: How do I activate a framework contract?
Supplier: How do I activate a framework contract?

How to activate a framework
This guide describes how to activate a Framework on the Contract Module. For how to set up a local contract, please follow the guide here.
- Go to the Contract Module.
- Select the green Add new Contract button which can be found at the top of the page.
- Select Framework from the Type dropdown box. You will be presented with a list of frameworks that are available to you to activate (i.e. where you have been appointed to a framework and this data has been provided to OneAdvanced by the relevant consortia).
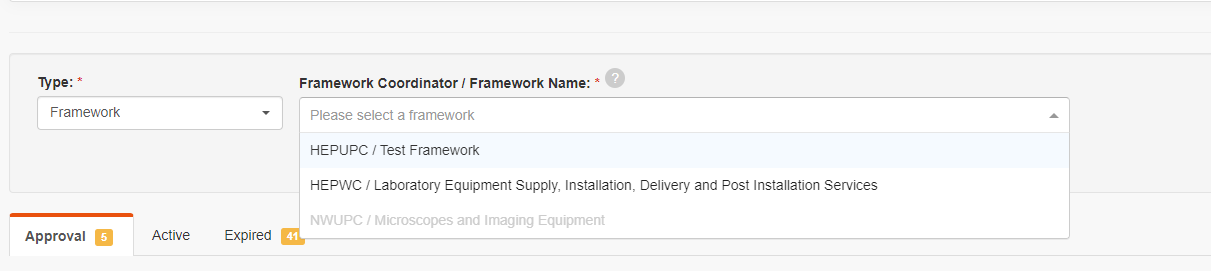
- Select the framework you would like to activate. The system will automatically populate a number of fields which cannot be edited, such as the start, end date and contract reference.
- Optional: If you would like to add information to the 'Owner' (whoever is responsible for this framework within your organisation) and 'Description' (100 characters maximum; a brief description of the framework) boxes, please add this in.

- Once completed, select Confirm. This will open the framework with further optional fields to populate:
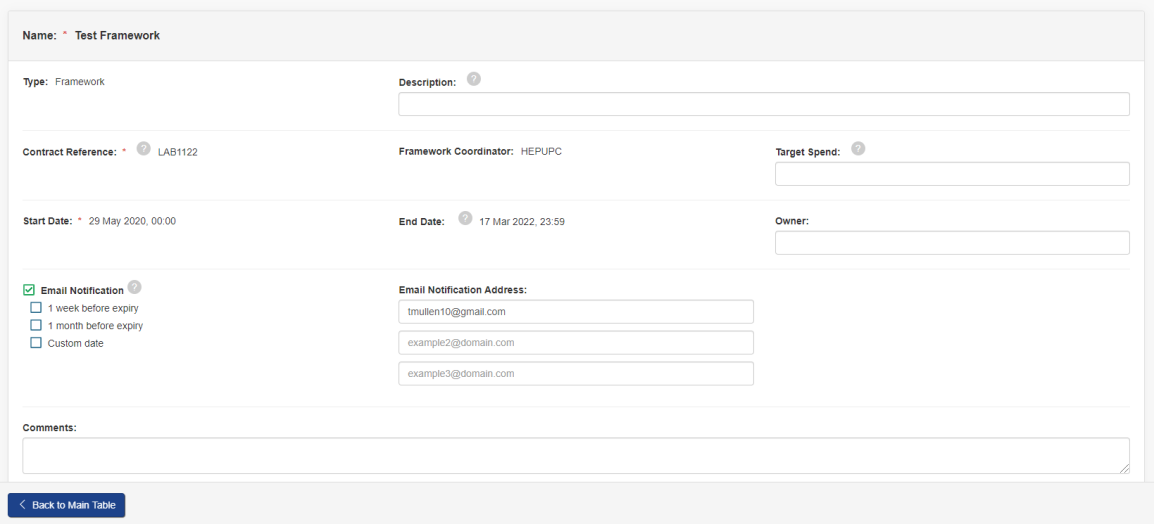
Field | Notes |
Target Spend | Suppliers can provide a numerical value which can then be used in future Insights reports, to track actual spend against target contract spend |
Email Notifications | Suppliers can select to be notified 1 week, 1 month, and/or a custom date prior to when a contract is due to expire |
Email Notification Address | Up to 3 email addresses can be included |
Comments | 500 characters maximum |
- Select Save in the right hand corner of the details section, and then proceed to the next steps laid out below.
Assigning products to a framework
Once a framework has been activated, you need to assign items to it.
- From within the framework, scroll to the Manage Attribute section. This is where the contract can be assigned to either supplier level (your full catalogue) or item level (specific products), and will determine your next steps:
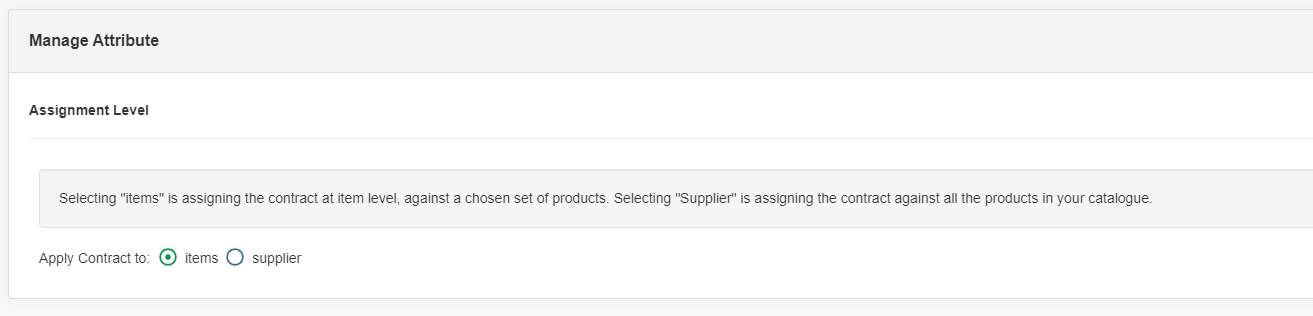
- If you have chosen Supplier level, please proceed to step 7. For item level, please follow the instructions below.
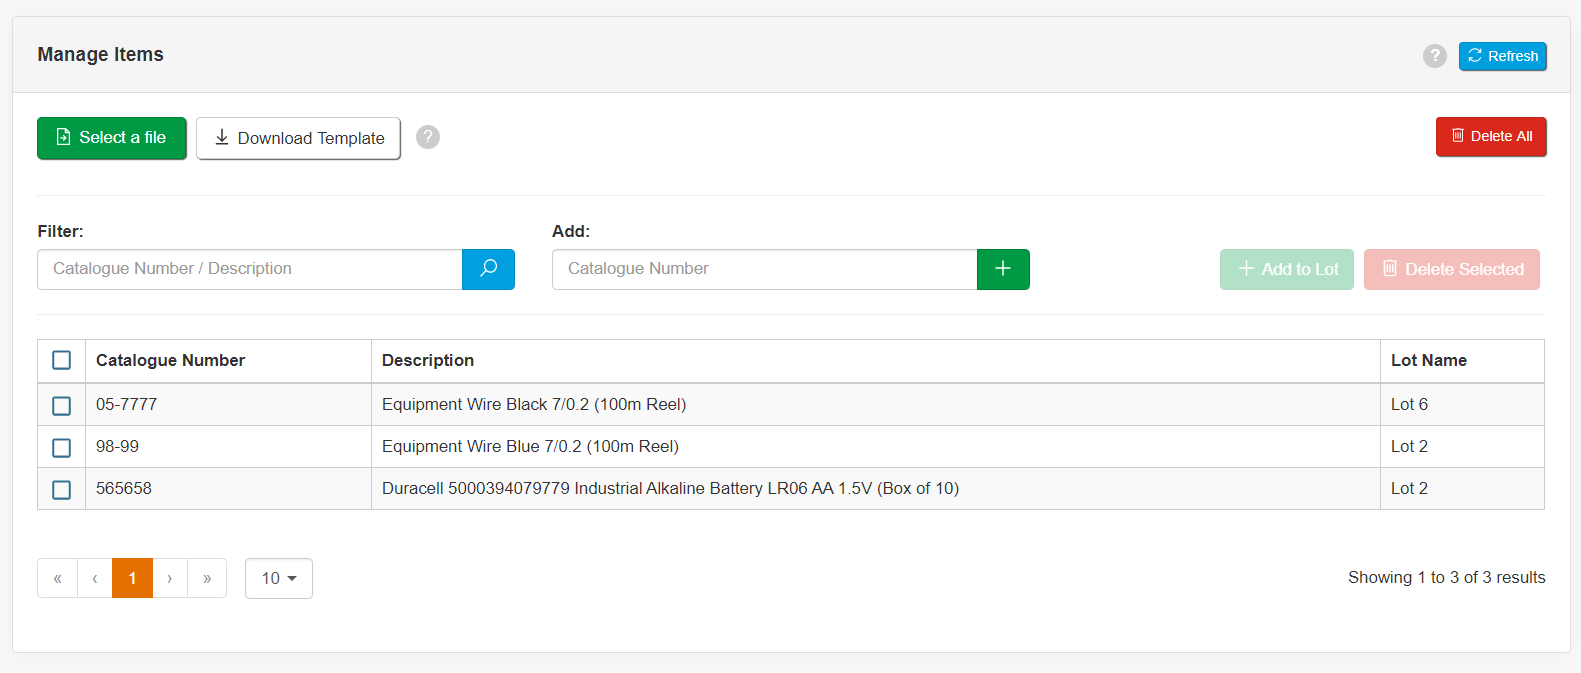
- Scroll to the Manage Items section of the contract, and download the template available. This contains two columns to be completed:
- Catalogue number
- Lot name (this can be left blank if no lots have been configured in the Manage Lots section)

- Save the completed template as a .csv or .csvx file
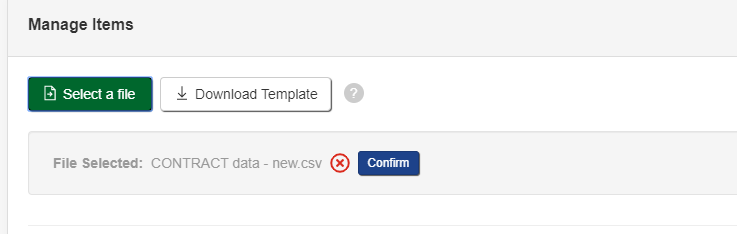
- From the Manage Items section, click Select a file. Locate the completed template, and once submitted, click the Confirm button:
- A status will appear of 'requested' while processing, and once complete, the items assigned to the contract will appear underneath:
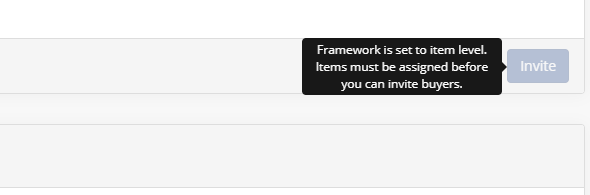
- Once all items are assigned (or if you chose 'supplier' level in step 1), you can invite the relevant buyer(s) to the framework. Scroll to the View Buyers section, and select the tick box against each buyer (or to select all, choose the tick box at the top next to 'Buyer'):
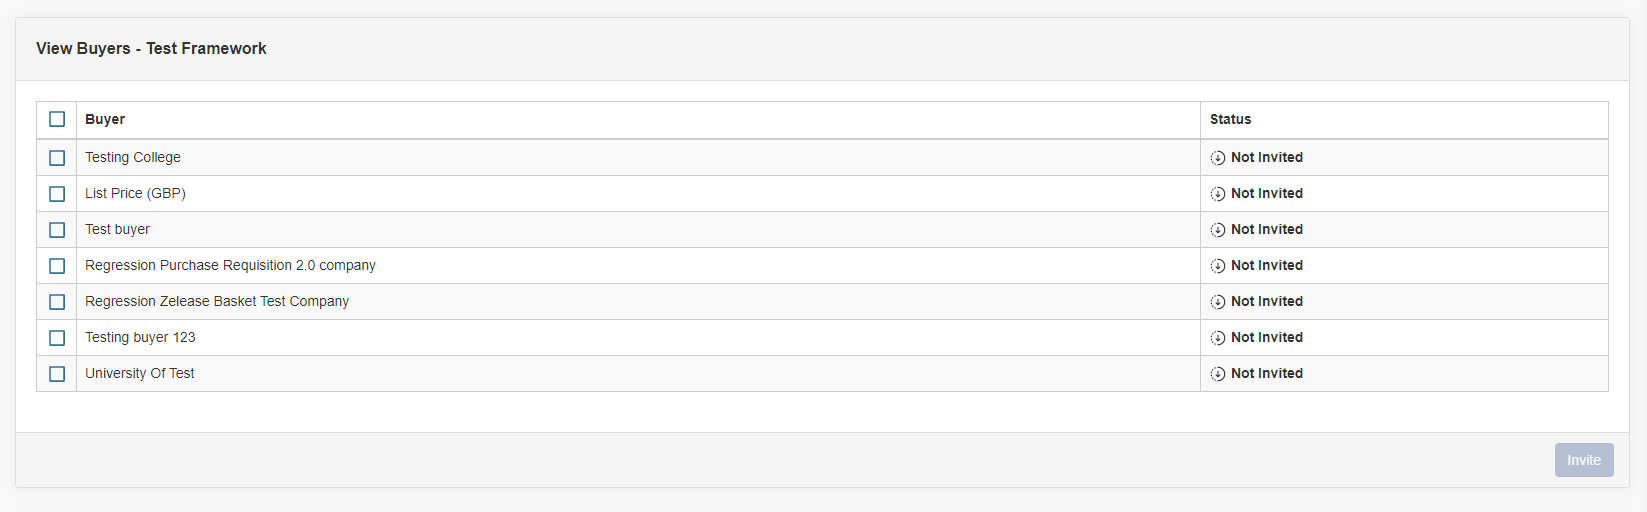
- Once selected, click the Invite button. The status for the chosen buyers will change to Pending
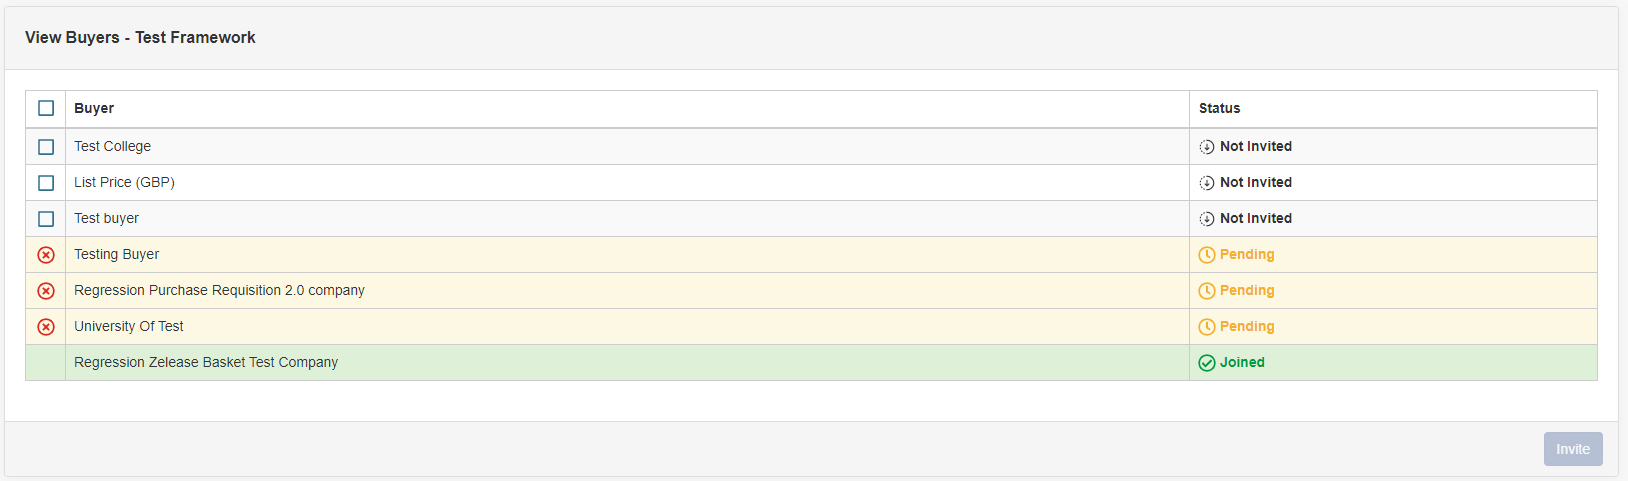
- Once a buyer has accepted the invitation (you will be notified via email) the status will change to Joined
Your products will appear with the contracted logo against them on the search results following an overnight refresh. Contract information will also be included within purchase order data too (if you receive your orders via XML please contact your Account Manager to arrange free testing to get this included):

Attaching documents
The Attachments section allows suppliers to store any internal documentation needed against a particular contract.
- A maximum of 100 attachments can be added against each contract
- Format types supported are - .pdf, .txt, .csv, .doc, .jpeg, .gif, .ppt, .xlsx, docx
- You can attach multiple attachments at once
To add attachments, select the Edit button, locate the files and click Confirm to upload. To remove any documents, use the Reset and Select files button, or alternatively to remove all attachments click the Reset button. Select Done once complete to save.
Rejected frameworks
Buyers may choose to reject a framework invitation (you will be notified via email), at which point the status will change to Rejected and you will see the comments the buyer has provided in the View Buyers section (and in the Action log):

If applicable (e.g. incorrect items assigned), you can make the relevant changes and resubmit the framework to the buyer(s) in question.
How to cancel an invitation to a buyer
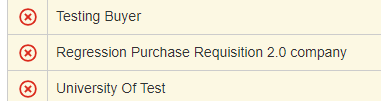
Suppliers can cancel an invitation to a buyer by selecting the red ‘X’ next to the buyer’s name:
Audit Logs
To review all actions relating to contracts, two options are available:
Recent Audit logs
This is the last section displayed at the bottom of each individual framework. It displays the 10 most recent actions performed against that contract, capturing the Date, Contract Name, the User that performed the action, the details of what the action was and an Actions column which displays downloadable options such as error exports and uploads of items:

Full Audit Log
Within the Contract Module there is a full audit log, which captures all changes made to all contracts (local and framework).
The audit log can be accessed from the Show Audit Log button which is displayed at the top right of the main landing page in the Contract module:

The same button can be used to hide the audit log once reviewed.